
Building a guest house or accessory dwelling unit (ADU)
Accessory Dwelling Units (ADUs) are secondary units that can be built on residential properties, providing an excellent opportunity for homeowners to increase their property value and generate rental income. However, understanding the many steps and requirements in California for ADU construction can be challenging. In this blog, we will provide you with step-by-step guidance on how to successfully build an ADU in California, from understanding the zoning laws and permitting process, to designing and constructing your guest house. Get ready to unlock the potential of your property with our expert tips and insights!
What does ADU stand for in construction?
The term ADU stands for “accessory dwelling unit” and refers to a secondary dwelling unit on a residential property that exists in addition to the primary dwelling or residence. You might also hear ADUs mistakenly referred to as an “additional dwelling unit,” “auxiliary dwelling unit” or “accessible dwelling unit.”
To be considered an ADU, there must already be a primary dwelling unit on the property. Accessory dwelling units are incredibly flexible spaces and can be used as a rental, a guest home, or even a personal workspace.
Other terms for ADU include granny flat, companion unit, casita, guest house, granny cottage, secondary living unit, mother-in-law apartment, second dwelling unit, in law suite, carriage house, au-pair suite… you may hear any of these terms used interchangeably for an accessory dwelling unit, but the meaning is all the same.
Is ADU construction different than other residential construction?
Yes, accessory dwelling unit construction is distinct from other residential projects due to unique regulatory challenges and the nature of the work involved.
ADUs face a complex blend of state and local regulations, often leading to intersecting and conflicting regulations. While state ADU laws in California aim for uniformity, local entities and Homeowners Associations (HOAs) add another layer of rules. Unaddressed issues in state laws leave room for varied local interpretations and solutions.
Detached ADUs also differ, as they are “infill” projects, not new construction on empty land or simple renovations. Adding an ADU requires integrating new structures into existing spaces, often with limited room due to specific site constraints and setbacks.
This evolving regulatory environment and the infill nature of ADUs can lead to unexpected roadblocks, potentially causing delays ranging from days to months. The resolution of these issues and the associated costs can vary significantly. Also, ADU costs are often much higher than homeowners expect. The cost per square foot for ADUs is often higher than for larger new homes, as the expenses for specialized planning, utility upgrades, and strict code compliance are spread over a smaller area, increasing the overall cost intensity of the project.
Who can build an ADU?
In California, any homeowner who has an existing primary residence on their property is eligible to build an accessory dwelling unit (ADU), provided they comply with both state and local laws governing ADU construction. This opportunity extends to owners of single-family homes as well as multifamily properties.
While state laws have been designed to streamline the approval process and reduce barriers to ADU construction, local jurisdictions may have additional criteria or restrictions, especially in areas with unique geographical or environmental considerations, such as the Coastal Zone or historic districts. These regulations include required setbacks for the ADU on the property.
What are the requirements for building an ADU in California?
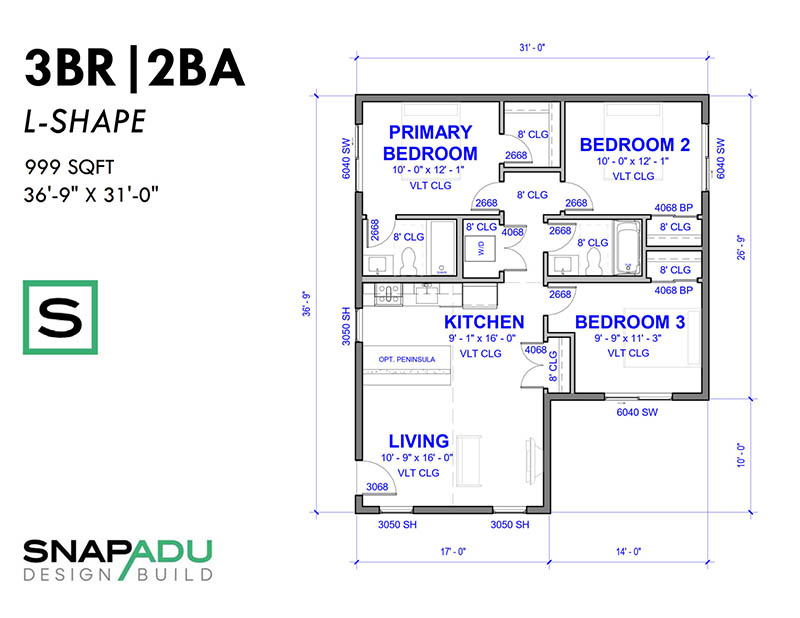
Building an accessory dwelling unit in California involves navigating a series of state and local regulations designed to ensure these structures meet specific standards for safety and design. California law permits the construction of ADUs on residential lots that have an existing dwelling. State regulations cap the size of detached ADUs at 1,200 square feet and limit their height to 16 feet. However, these are baseline standards; local jurisdictions may impose stricter or more lenient criteria. It’s crucial for homeowners to understand that while state laws aim to standardize ADU construction across California, the specifics can vary significantly from one city or county to another.
So, it is of the utmost importance to check your city’s legislation on ADU builds to ensure you are compliant on both a state and local level.
What ADU construction types are there?
Before diving into the specifics of building an ADU, it’s important to note that the rest of our guide focuses on stick-built construction, a traditional method where the structure is built on-site from the ground up. Stick-built ADUs offer unparalleled customization and flexibility, allowing homeowners to tailor every aspect of the design to fit their specific needs and preferences. For those weighing the differences between stick-built, prefab, and modular ADUs, we recommend exploring our comprehensive guide on Prefab vs Stick Built vs Modular ADUs to understand the pros and cons of each construction method. This will help you make an informed decision on which construction type best suits your project’s requirements, budget, and timeline.
How do you build an ADU? What are the steps?
The process to build a granny flat from scratch is carried out in roughly ten steps. Within each of these steps, there are numerous tasks to complete, pitfalls to be aware of, and regulations within your jurisdiction that must be considered.
1. Feasibility & Design
Once you decide you are interested in an ADU, an initial feasibility study is carried out to be sure this project can actually be completed… and on budget. This involves examining property setbacks, zoning, topography, easements and anything that might affect a successful ADU build. Your build may also require additional site work depending on its condition, so it is important to be sure you are clear on the anticipated budget to prepare your site for an ADU. If you are building on a small lot in a dense neighborhood, a survey may also be required.
While figuring out the best placement for your unit on the property, you will also finalize your design for the ADU. When determining the best floor plan for your lot, you must consider your personal budget, the amount of space available to you, and the intended use of your ADU. Will you want an extra room for hobbies, or a larger living space for entertaining?
You may also be working within a strict budget and looking to maximize your cost per square foot. These are things to take into account when determining your ADU floor plan. Your contractor will also be able to advise you towards the best layout for your unit. Once your ADU design is set, and you have reviewed it to ensure it is to your liking, all of your specifications will be rolled into a full set of construction documents that will be submitted to your city.
2. Permitting & Revisions
The process of obtaining permits for your ADU project kicks off with the assembly of a set of construction documents that outline all the details of your ADU- even down to the location of each light switch. Your city will review these documents to make sure the proposed build will be carried out in accordance with their regulations and laws. It is most common for the city to return these plans with a few revisions that must be made before the permit can be issued. Not to worry though- your contractor will have planned for these revisions and will be prepared to make them. During this time, you will also be making your finish material selections so that the items can be ordered in time for the build.
Throughout the permitting process, you will be required to pay various plan check and permitting fees depending on the size of your unit. Some jurisdictions allow certain fees to be waived if your unit lies under a size threshold. Once these fees are paid and revisions are made, you will be ready to begin mobilization and building.
3. Mobilization
Once an ADU project is permitted, construction mobilization begins within 2 weeks. The ADU’s footprint is located on the property with stakes to visualize the unit in relation to existing features of the property, and to get an idea of any necessary site work that will need to be taken care of before the build. This may include removing foliage and rocks, or filling in a hole. You may also see the temporary toilet facility moved onto the job site during the mobilization phase. Your project manager will assemble the approved documents and bring them on-site for reference during construction, where you will meet and discuss the next few steps of the project.
4. Site Work
The initial site work and prep serves to offer a clean, stable base for the cement to rest on top of. If your property needs a retaining wall, or any special reinforcements, this is when those will be accounted for. Various utilities will be run during the site work phase, including septic if it is necessary on your property. All of your electricity will be taken into account during this time, which will include any upgrades to your electric panel and preparation to install solar panels on your ADU down the line.
Grading will take place during site work, which is the step most people picture when they think of this phase. The soil of your lot will be flattened and primed for a cement pad to then be laid on top, and utility lines will be run under the future location of the unit. If you are looking to build your ADU on a slope, additional work will need to be done with the soil to ensure your ADU is level when it is constructed and will stay that way for years to come.
5. Trenching & Foundation
Following mobilization, trenching and foundation work is then carried out. Trenches are dug around the footprint of the soon-to-be ADU, as well as outside that space, in order to lay the foundation and run utilities like water, gas, and electricity. After these trenches are dug, wooden planks will create the skeleton of the foundation, which is then filled with concrete. More about complex ADU foundations.
6. Framing
Just like it sounds, framing begins once the foundation is laid. As with the foundation, the rough frame of the unit is built with wooden planks. The interior of the ADU often looks like a jumbled mess of beams, but the exterior makes it very clear what the unit will eventually look like. This step of the process is fairly quick, but requires immense concentration and skill, as the home is framed according to exact specifications.
7. Rough MEP
This is one of the lesser-known steps of building, and rightfully so- it can be difficult to distinguish the difference between the framing and rough MEP portion of the build. However, the main difference is that, to the untrained eye, wires will begin to appear throughout the home at random. In reality, rough MEP refers to the integration of utility lines into the unit. MEP literally stands for “Mechanical, Electrical, and Plumbing,” as these are the three main lines that begin to slither among the bare beams. Your electricity cables and gas lines will be added into the frame of the ADU, to eventually become hidden within the walls.
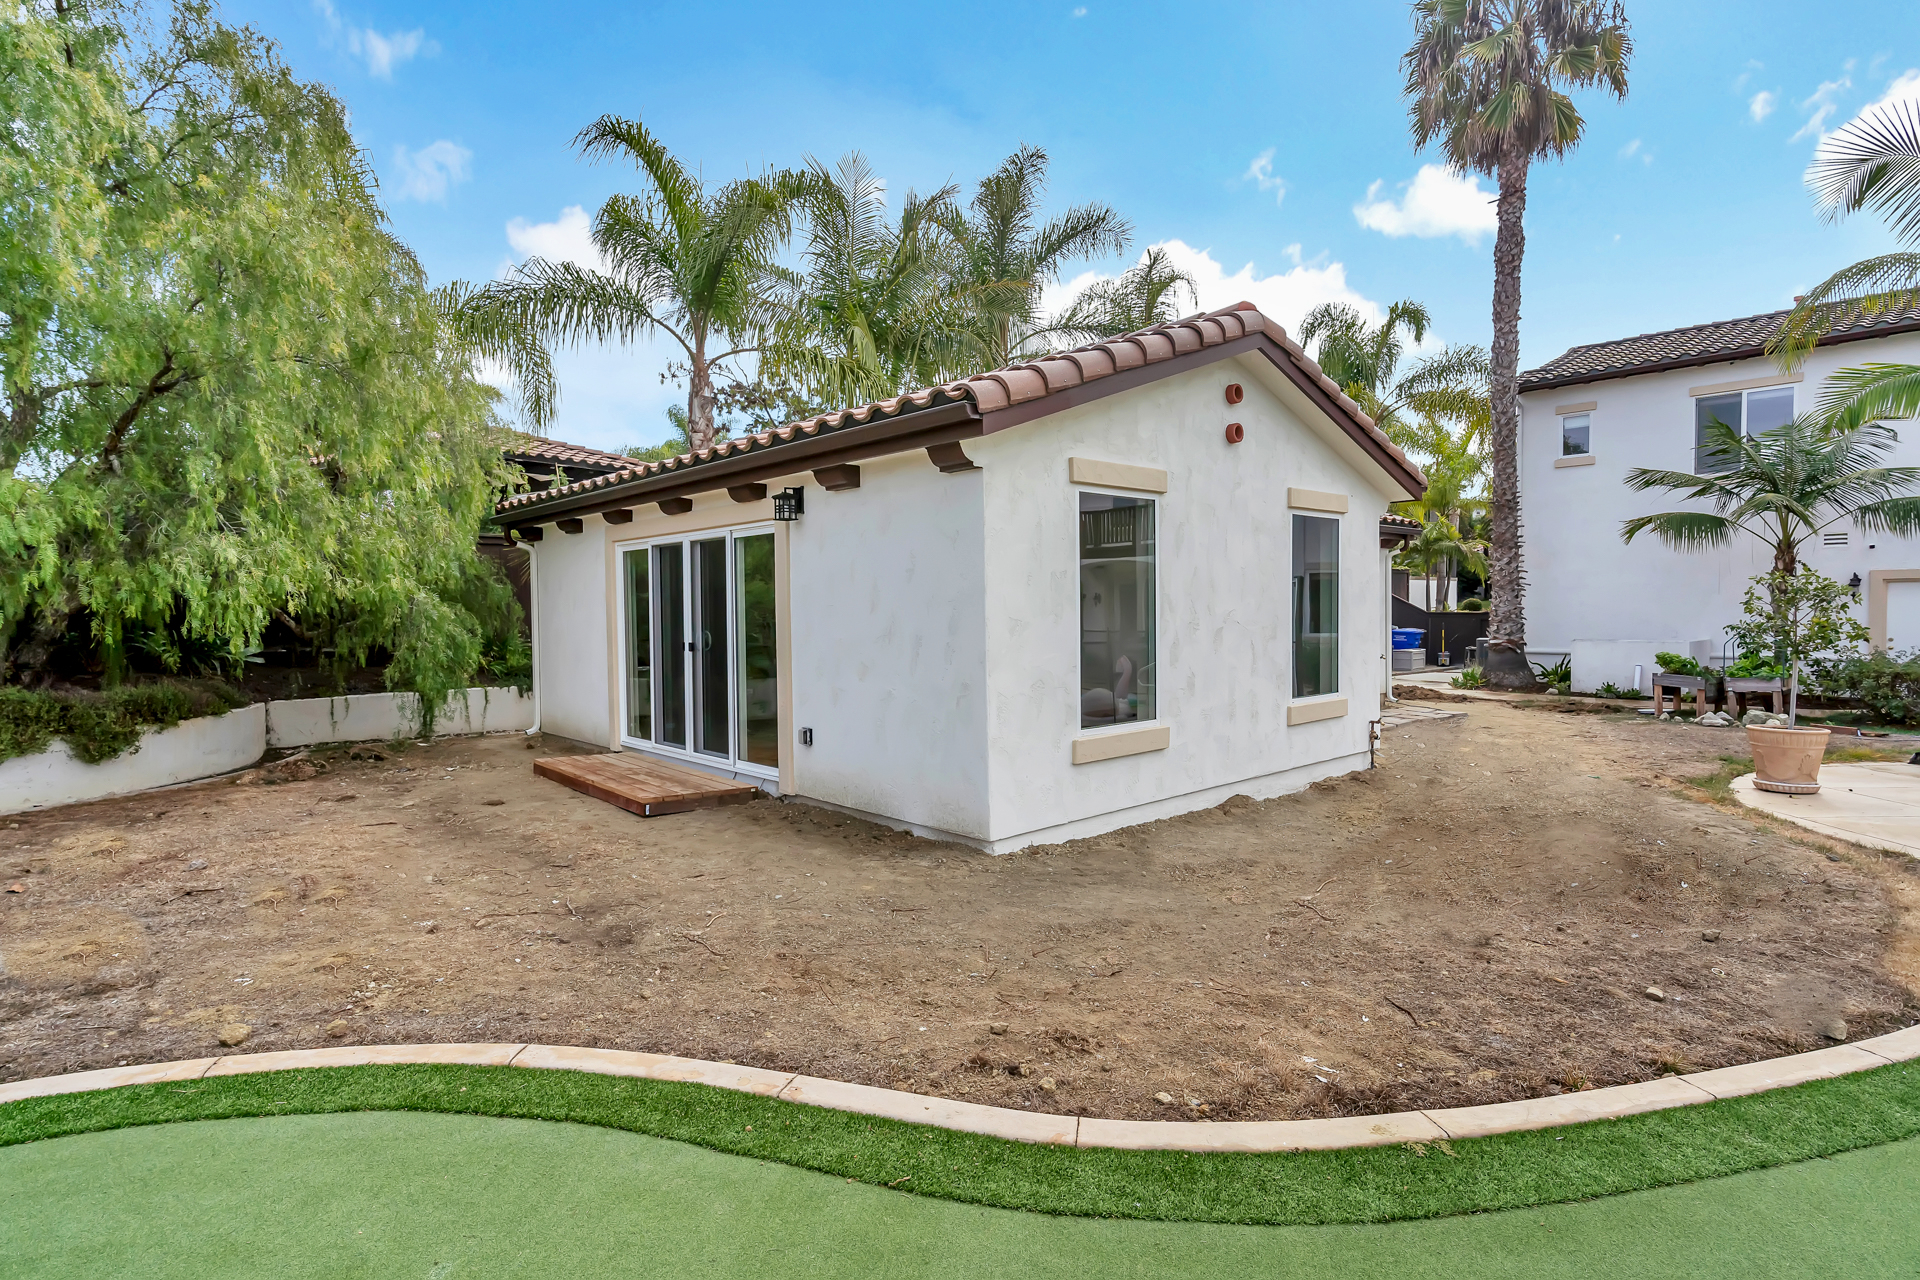
8. Exterior Finishes / ”Water Tight”
Prior to installing anything that could become damaged by water, exterior finishes are installed, including roof, stucco and/or siding, windows and exterior doors. Once these are installed, the interior of the ADU becomes “water tight” allowing work on the interior to begin. While the exterior finishes will not be completed by the time interior work starts, the basic elements of the exterior finishes that specifically provide the water barrier will be in place. It will continue to take several more weeks to finalize these finishes while the interior work continues to progress in parallel.
9. Insulation & Drywall
There is both an interior and exterior insulation that is installed into the walls of your ADU. Large, pink, marshmallow-like pillows are squished between interior beams to seal heat inside the home. Meanwhile, black, rubbery sheets are laid along the exterior. Both of these layers seal heat within (or outside of) the home. This step is incredibly important, as it saves you money down the line. Improper insulation of the home will necessitate greater use of an air conditioner or heater, which becomes costly after a while. However, if the windows and walls are sealed and insulated properly, your home’s climate should remain comfortable. Once doors and windows have been installed, the next order of business is to install the drywall. Your ADU will really take shape on the inside at this stage.
10. Interior Finishes
The finish selections you made during the permitting phase finally come to life in this stage of a build. What was once a blank canvas inside your ADU slowly turns into a home step-by-step, starting with the valves and inserts of each plumbing fixture around the unit. Your wall is painted once these valves and inserts are sealed into the wall, before your final plumbing fixtures- like the toilet and sink- are then installed.
Flooring is installed around all of the new fixtures and covered with a protective coating to maintain its integrity during the rest of the build. Cabinets are installed throughout the home, along with all the finish carpentry work required to install doors, baseboards, and closets. Countertops and appliances are installed the same time, which serves to wrap up the majority of the larger changes your ADU undergoes. By the time this step is finished, your ADU has been transformed from an empty white shell into a home. It is then ready to be cleaned and touched up.
11. Final Touches for Building an ADU
During the final phase of the project, all of the little details remaining are taken care of. This involves a final cleaning, making sure each fixture is properly installed and ready for use, and that everything is working properly. The dumpster will be removed during this time as well, and a final walkthrough will be conducted before the keys are handed over. A final inspection by the city happens as well, after which the unit will be awarded “Certificate of Occupancy.” This is typically the completion of the scope of work for your ADU builder, and afterwards, you may also want to complete landscaping & any flatwork outside of the ADU. There are many landscaping ideas you can implement, so if you want to gather some inspiration check out outdoor landscaping products and start visualizing your outdoor look.
Throughout this process, SnapADU has literally hundreds of planned schedule items and to-do lists for our team and our subcontractors so that each project runs smoothly. We have built out these templates over years of designing, permitting and building ADUs. Unique to a design / build contractor is the ability to make changes to the design & permitting phase that will make the build-out easier and more predictable. For instance, we know exactly what the ADU-specific inspection requirements will be, which means we can incorporate those items into the plans to prevent downstream delays.
Building an ADU is a complex process, but we’re here to manage the entire project for you. Let us know a bit about your ADU project so we can provide feedback on feasibility, cost and timeline for your specific accessory dwelling unit.

0 Comments